GPIO LED Control
Since the Raspberry Pi Model B+ (the second version of the Pi 1) the Raspberry Pi has had a 40 Pin header (24 Pins on the very first Pi). These pins provide some very useful functions, but what we are interested in are the GPIO pins that we can turn on and off (some pins have dedicated functions).
An easy way to see if we are actually turning a pin on or off is to use an LED that will light up upon the pin becoming active.
Please be aware, the GPIO pins are 3.3v Logic, and are restricted to 16mA - exceeding 16 mA will damage your Pi
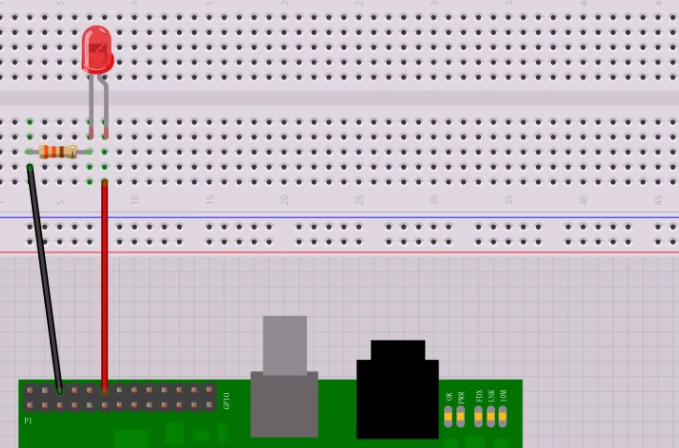
Here is a simple circuit of and LED connected to a GPIO Pin.

This is a red LED that has a 2V drop across it, so 3.3v-2v = 1.3v. The LED only needs around 5mA, so R=V/I = 1.3/0.005 = 260 Ohms.
When the Pin goes high (under our software control) it will provide 3.3v, and thus the LED will light (famous last words)
If you are using your Raspberry Pi via SSH or a Remote Desktop session, you need to enable remote access of the GPIO Pins, instructions for this are here:
Once you have connected the circuit, we can create the Python programme, in this example we will be doing it from the command line using the editor nano:
sudo nano LED.py (starts the nano editor with a new file called LED.py)
Now enter this code: (you can copy and paste by the way)
  #import modules
  import RPi.GPIO as GPIO    # This imports the GPIO libarary that allows the use of the GPIO pins,
  import time                # This imports the time libarary (for delays among other things)
                             # These libraries are built in to Raspbian.


  GPIO.setmode (GPIO.BOARD)  # This sets the GPIO pin numbering. Our LED is connected to Pin 12,
                             # so we can reference it by using BOARD as pin 12. However there is
                             # another option (BCM) where we can reference a pin by it's name, pin
                             # 12 is called GPIO18 (a reference to its place on the chip).

  GPIO.setup(12, GPIO.OUT)   # Sets the GPIO pin as output. (as opposed to input, which would
                             # read in a voltage (but only in terms of a 0 or a 1))

  GPIO.output(12, 0)         # sets the GPIO Pin 12 to low (so 0v)

  time.sleep(1)              # waits one second (settling time)

  GPIO.output(12, 1)         # sets the GPIO Pin 12 to high (so 3.3v) LED will turn on

  time.sleep(3)              # waits 3 seconds, so LED will be on for 3 seconds

  GPIO.cleanup()             # Resets all the GPIO pins to their default state (LED will go off)
Because we are accessing the GPIO, we need to run our Python program as the sudo user:
sudo python LED.py
The LED should come on for 3 seconds, then go off. The program will then end.
You can see it in operation Here:
Remember:
Pins are 3.3v
16mA MAX
This guide is comprised of information from a youtube video by Gaven MacDonald. Thanks Gaven.
