Table of Contents
Using Terraform
Now that we have our simple Terraform script, we can start to use Terraform. First we need to test the script for any errors, then we can launch our EC2 Instance by running the script.
Terraform Plan
The terraform plan command is used to create an execution plan. Terraform performs a refresh, unless explicitly disabled, and then determines what actions are necessary to achieve the desired state specified in the configuration files. The plan can be saved using -out, and then provided to terraform apply to ensure only the pre-planned actions are executed.
As I only have one configuration file, I can just use the command:
terraform plan
For my configuration file, I get the following output.
Refreshing Terraform state in-memory prior to plan...
The refreshed state will be used to calculate this plan, but will not be
persisted to local or remote state storage.

The Terraform execution plan has been generated and is shown below.
Resources are shown in alphabetical order for quick scanning. Green resources
will be created (or destroyed and then created if an existing resource
exists), yellow resources are being changed in-place, and red resources
will be destroyed. Cyan entries are data sources to be read.

Note: You didn't specify an "-out" parameter to save this plan, so when
"apply" is called, Terraform can't guarantee this is what will execute.

+ aws_instance.example
    ami:                          "ami-40a8bf24"
    associate_public_ip_address:  "<computed>"
    availability_zone:            "<computed>"
    ebs_block_device.#:           "<computed>"
    ephemeral_block_device.#:     "<computed>"
    instance_state:               "<computed>"
    instance_type:                "t2.micro"
    ipv6_address_count:           "<computed>"
    ipv6_addresses.#:             "<computed>"
    key_name:                     "TestSvr"
    network_interface.#:          "<computed>"
    network_interface_id:         "<computed>"
    placement_group:              "<computed>"
    primary_network_interface_id: "<computed>"
    private_dns:                  "<computed>"
    private_ip:                   "<computed>"
    public_dns:                   "<computed>"
    public_ip:                    "<computed>"
    root_block_device.#:          "<computed>"
    security_groups.#:            "1"
    security_groups.2525401260:   "launch-wizard-1"
    source_dest_check:            "true"
    subnet_id:                    "<computed>"
    tags.%:                       "1"
    tags.Name:                    "terraform-instance"
    tenancy:                      "<computed>"
    volume_tags.%:                "<computed>"
    vpc_security_group_ids.#:     "<computed>"


Plan: 1 to add, 0 to change, 0 to destroy.
This is the type of output you will get if your script file does not contain any errors.
Terraform Apply
Before starting the Terraform apply option, I suggest you log in to your AWS account so that you can monitor the progress of the script.
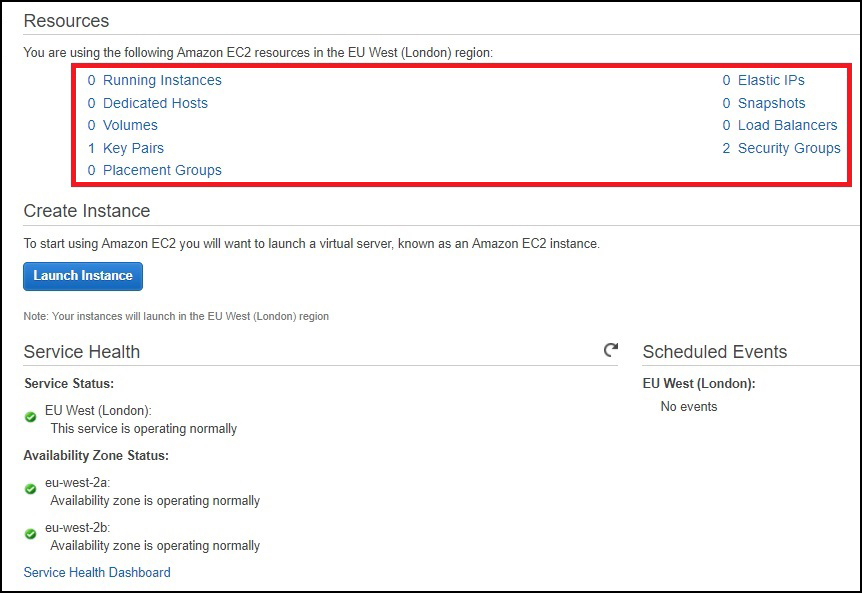
Here is my AWS account with no configured EC2 Instances.

In the above example we can see that there is no EC2 Instance configured on this AWS account. There is a default security group that we configured, as well as our key pair. These are both specified in our Terraform script. Remember this script does not create these elements, it just uses them.
If we select Running Instances, then this will be empty (unless you have manually created some.)

Now we can run our Terraform Script.
In the command window where you ran Terraform Plan, you can now use:
terraform.exe apply
If you don't have any errors, then you will see an output similar to below:
aws_instance.example: Creating...
  ami:                          "" => "ami-40a8bf24"
  associate_public_ip_address:  "" => "<computed>"
  availability_zone:            "" => "<computed>"
  ebs_block_device.#:           "" => "<computed>"
  ephemeral_block_device.#:     "" => "<computed>"
  instance_state:               "" => "<computed>"
  instance_type:                "" => "t2.micro"
  ipv6_address_count:           "" => "<computed>"
  ipv6_addresses.#:             "" => "<computed>"
  key_name:                     "" => "TestSvr"
  network_interface.#:          "" => "<computed>"
  network_interface_id:         "" => "<computed>"
  placement_group:              "" => "<computed>"
  primary_network_interface_id: "" => "<computed>"
  private_dns:                  "" => "<computed>"
  private_ip:                   "" => "<computed>"
  public_dns:                   "" => "<computed>"
  public_ip:                    "" => "<computed>"
  root_block_device.#:          "" => "<computed>"
  security_groups.#:            "" => "1"
  security_groups.2525401260:   "" => "launch-wizard-1"
  source_dest_check:            "" => "true"
  subnet_id:                    "" => "<computed>"
  tags.%:                       "" => "1"
  tags.Name:                    "" => "terraform-instance"
  tenancy:                      "" => "<computed>"
  volume_tags.%:                "" => "<computed>"
  vpc_security_group_ids.#:     "" => "<computed>"
aws_instance.example: Still creating... (10s elapsed)
aws_instance.example: Still creating... (20s elapsed)
aws_instance.example: Creation complete (ID: i-0781af6ecb9c0f2f5)

Apply complete! Resources: 1 added, 0 changed, 0 destroyed.

The state of your infrastructure has been saved to the path
below. This state is required to modify and destroy your
infrastructure, so keep it safe. To inspect the complete state
use the `terraform show` command.

State path:
Now we can check the Running Instances page again.
Initially you will see a status of 'Pending' but this will quickly change to 'Running'

We can see the following information has been populated according to our Script:
- Name: terraform0Instance
- Instance Type t2.micro
- Availability Zone: eu-west-2a (yes we only specify eu-west-2, the a/b/c suffix is automatic)
- Key-Name TestSvr
The EC2 Instance is now running and using your key-pair and SSH you should be able to login and start using your virtual machine.
Terraform Destroy
Terraform Destroy does exactly that, using the script file you created, it undoes all of your settings. When Terraform applied your settings it stored the state of your EC2 Instance, so it already knows what settings have been applied.
To use enter the following:
terraform destroy
Below is an example output of a terraform destroy command.
Before the destroy action is taken, there is a confirmation request.
Do you really want to destroy?
  Terraform will delete all your managed infrastructure.
  There is no undo. Only 'yes' will be accepted to confirm.

  Enter a value:
You have to enter yes to start the destroy.
Terraform will then issue the command to AWS, depending on the complexity of your EC2 Instance, and what it is doing, the command will take a varying amount of time to complete.
aws_instance.example: Refreshing state... (ID: i-0781af6ecb9c0f2f5)
aws_instance.example: Destroying... (ID: i-0781af6ecb9c0f2f5)
aws_instance.example: Still destroying... (ID: i-0781af6ecb9c0f2f5, 10s elapsed)

aws_instance.example: Still destroying... (ID: i-0781af6ecb9c0f2f5, 20s elapsed)

aws_instance.example: Still destroying... (ID: i-0781af6ecb9c0f2f5, 30s elapsed)

aws_instance.example: Destruction complete

Destroy complete! Resources: 1 destroyed.
Now you can check your Running Instances to see what has happened.

The Instance State will first change to Shutting Down, then to Terminated. Terminated Instances take one or two hours to finally disappear from your Running Instance page.


