This is an old revision of the document!
GPIO LED Control
Since the Raspberry Pi Model B+ (the second version of the Pi 1) the Raspberry Pi has had a 40 Pin header (24 Pins on the very first Pi). These pins provide some very useful functions, but what we are interested in are the GPIO pins that we can turn on and off (some pins have dedicated functions).
An easy way to see if we are actually turning a pin on or off is to use an LED that will light up upon the pin becoming active.
Please be aware, the GPIO pins are 3.3v Logic, and are restricted to 16mA
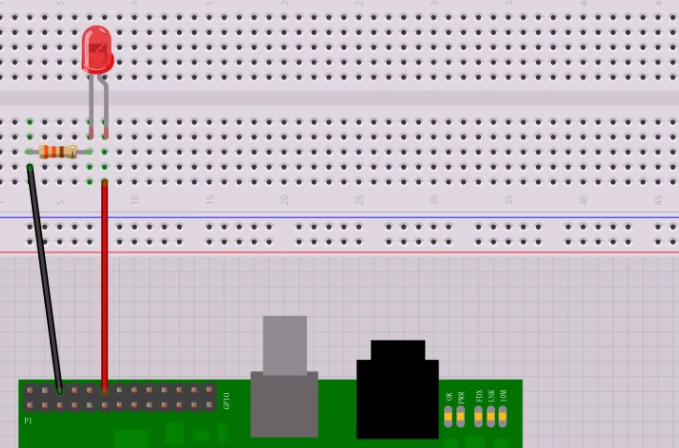
Here is a simple circuit of and LED connected to a GPIO Pin.

This is a red LED that has a 2V drop across it, so 3.3v-2v = 1.3v. The LED only needs around 5mA, so R=V/I = 1.3/0.005 = 260 Ohms.
When the Pin goes high (under our software control) it will provide 3.3v, and thus the LED will light (famous last words)
If you are using your Raspberry Pi via SSH or a Remote Desktop session, you need to enable remote access of the GPIO Pins, to do this from the command line, do the following:
sudo raspi-config
  ┌──────────────────┤ Raspberry Pi Software Configuration Tool (raspi-config) ├───────────────────┐
  │                                                                                                │
  │    1 Expand Filesystem                       Ensures that all of the SD card storage is        │
  │    2 Change User Password                    Change password for the default user (pi)         │
  │    3 Boot Options                            Choose whether to boot into a desktop envi        │
  │    4 Wait for Network at Boot                Choose whether to wait for network connect        │
  │    5 Internationalisation Options            Set up language and regional settings to m        │
  │    6 Enable Camera                           Enable this Pi to work with the Raspberry         │
  │    7 Add to Rastrack                         Add this Pi to the online Raspberry Pi Map        │
  │    8 Overclock                               Configure overclocking for your Pi                │
  │    9 Advanced Options                        Configure advanced settings                       │
  │    0 About raspi-config                      Information about this configuration tool         │
  │                                                                                                │
  │                                                                                                │
  │                           <Select>                           <Finish>                          │
  │                                                                                                │
  └────────────────────────────────────────────────────────────────────────────────────────────────┘
Advanced Options:
  ┌──────────────────┤ Raspberry Pi Software Configuration Tool (raspi-config) ├───────────────────┐
  │                                                                                                │
  │    A1 Overscan                               You may need to configure overscan if blac  ↑     │
  │    A2 Hostname                               Set the visible name for this Pi on a netw  ▮     │
  │    A3 Memory Split                           Change the amount of memory made available  ▒     │
  │    A4 SSH                                    Enable/Disable remote command line access   ▒     │
  │    A5 SPI                                    Enable/Disable automatic loading of SPI ke  ▒     │
  │    A6 I2C                                    Enable/Disable automatic loading of I2C ke  ▒     │
  │    A7 Serial                                 Enable/Disable shell and kernel messages o  ▒     │
  │    A8 Audio                                  Force audio out through HDMI or 3.5mm jack  ▒     │
  │    A9 1-Wire                                 Enable/Disable one-wire interface           ▒     │
  │    AA GPIO Server                            Enable/Disable remote access to GPIO pins   ↓     │
  │                                                                                                │
  │                                                                                                │
  │                           <Select>                           <Back>                            │
  │                                                                                                │
  └────────────────────────────────────────────────────────────────────────────────────────────────┘
Select GPIO Server
                     ┌──────────────────────────────────────────────────────────┐
                     │                                                          │
                     │ Would you like the GPIO server to be accessible over the │
                     │ network?                                                 │
                     │                                                          │
                     │                                                          │
                     │                                                          │
                     │                                                          │
                     │                                                          │
                     │                                                          │
                     │                                                          │
                     │                                                          │
                     │                                                          │
                     │                                                          │
                     │                                                          │
                     │                                                          │
                     │                                                          │
                     │               <Yes>                  <No>                │
                     │                                                          │
                     └──────────────────────────────────────────────────────────┘
You will get a confirmation that the GPIO Server is available.
  ┌──────────────────┤ Raspberry Pi Software Configuration Tool (raspi-config) ├───────────────────┐
  │                                                                                                │
  │    1 Expand Filesystem                       Ensures that all of the SD card storage is        │
  │    2 Change User Password                    Change password for the default user (pi)         │
  │    3 Boot Options                            Choose whether to boot into a desktop envi        │
  │    4 Wait for Network at Boot                Choose whether to wait for network connect        │
  │    5 Internationalisation Options            Set up language and regional settings to m        │
  │    6 Enable Camera                           Enable this Pi to work with the Raspberry         │
  │    7 Add to Rastrack                         Add this Pi to the online Raspberry Pi Map        │
  │    8 Overclock                               Configure overclocking for your Pi                │
  │    9 Advanced Options                        Configure advanced settings                       │
  │    0 About raspi-config                      Information about this configuration tool         │
  │                                                                                                │
  │                                                                                                │
  │                           <Select>                           <Finish>                          │
  │                                                                                                │
  └────────────────────────────────────────────────────────────────────────────────────────────────┘
Now Select Finish - You will be back at the command prompt (you may need to reboot)
