This is an old revision of the document!
Table of Contents
Under Monitor Displays

This Project is work in progress
The Experience Center at Southampton has 8 x HD Monitors for PQ comparisons. To allow customers to identify and track what content is on each screen we need a solution that allows us to display clearly what is on each monitor. While we could use OSD, these can deteriorate on low bit rate tests. So we have decided to use some under monitor displays. These are 2 Line LCD screens that sit under the monitors and display messages identifying content such as 'MPEG2 SD' or 'Service 1' etc.
While these can be purchased, they can run in to sever thousand £ for each unit. We only require a simple low cost solution, for this we are using LCD displays that we already own (2 x 40 Char displays from RX units that we are scrapping). These displays will be driven from Raspberry Pis, then input for the diplay messages will be via a web interface to the primary Raspberry Pi.
As the LCD displays are two line, we will use four of these displays, one for each pair of monitors, the upper line for the upper monitor, lower line for the lower monitors. The first Raspberry Pi will run monitors 1 and 2, this Raspberry Pi will also be the master where the web interface to control the displays is running.

The other three Raspberry Pi's will run the remaining monitors, these will talk to the primary Raspberry Pi to see what messaging they need to display.
Master Raspberry Pi
The primary Raspberry Pi does a little more than the others. As well as writing to the LCD display, this unit has a web server (Apache) and PHP running. The web server hosts a text file (my_data.txt) that is hosted and is editable via a web interface and PHP.
For this to work we need the following installed and configured
Set Static IP Address
To set a static IP address, we need to login to the RPi via SSH and change the following file:
The default login is username: pi and password: raspberry
/etc/dhcpcd.conf
Enter the following
  sudo nano /etc/dhcpdc.conf

  Add these lines to the end of the file (default is dhcp) using  your own IP Address details

  eth0
  static ip_address=192.168.1.11/24
  static routers=192.168.1.1
  static domain_name_servers=192.168.1.4
Use Ctrl-X to exit and Y to save, now reboot the pi and connect to the new address
Raspi Config
From the terminal, run:
sudo raspi-config
You will see the following menu, there are several items we want to change here.
┌────────────────────┤ Raspberry Pi Software Configuration Tool (raspi-config) ├───────────────────────────┐
│                                                                                                          │
│     1 Expand Filesystem            Ensures that all of the SD card storage is available to the           │
│     2 Change User Password         Change password for the default user pi)                              │
│     3 Boot Options                 Choose whether to boot into a desktop environment or the command line │
│     4 Wait for Network at Boot     Choose whether to wait for network connection during boot             │
│     5 Internationalisation Options Set up language and regional settings to match your location          │
│     6 Enable Camera                Enable this Pi to work with the Raspberry Pi Camera                   │
│     7 Add to Rastrack              Add this Pi to the online Raspberry Pi Map (Rastrack)                 │
│     8 Overclock                    Configure overclocking for your Pi                                    │
│     9 Advanced Options             Configure advanced settings                                           │
│     0 About raspi-config           Information about this configuration tool                             │
│                                                                                                          │
│                                                                                                          │
│                             <Select>                                   <Finish>                          │
│                                                                                                          │
└──────────────────────────────────────────────────────────────────────────────────────────────────────────┘
Select Option 2 (Change User Password) - Change the password to Ericss0n
Select Option 3 (Boot Options) - Change to B2 Console Autologin Text console, automatically logged in as 'pi' user
Select Option 9 (Advanced) then A2 (HostNane) - Change the Hostname to UMD00n (where n is the display number)
Select Finish when asked to reboot select Yes
Update RPI
Even if you downloaded the latest version of Raspbian, chances are there are some updates. To update the RPi use the following command line:
sudo apt-get update && sudo apt-get upgrade -y
This will most likely take a few minutes on a new install.
Install PHP
We need to install PHP so that the web interface will function. To install PHP use the following command line:
sudo apt-get install php5
There is no PHP7 for RPi yet, but version 5 will be fine.
Install Apache Webserver
Apache is the Web Server that will host our website.
sudo apt-get install apache2
This may already exist, if so this will also update it.
Configure Apache Webserver
We have to configure Apache Webserver, mainly so that Apache knows where our site is located. There are two files we need to edit, and they are:
- /etc/apache2/apache2.conf
- /etc/apache2/sites-enabled/000-default.conf
Before we begin this process, create a folder in your home location called Python and give Apache rights:
  mkdir /home/pi/Python

  sudo chmown www-data /home/pi/Python
  sudo chmod 777 /home/pi/Python
We need to copy the website to the /home/pi/Python location, for the Mater there are five files:
- bootstrap.min.css - This is a style sheet that controls the look of the site
- index.php - The main site for entering text (this is what Apache will host)
- launchUMD.sh - A script to auto start the UMD at boot
- my_data.txt - This holds the LCD data text, and is edited by the index.php
- UMDisplay01.py - The Python code that runs the LCD
These files need to be copied to the /home/pi/Python location
Apache2.conf
Open and edit the /etc/apache2/apache2.conf file and add these lines:
<Directory /home/pi/Python>
        Options Indexes FollowSymLinks
        AllowOverride All
        Require all granted
</Directory>
Save the file and exit.
000-default.conf
Open /etc/apache2/sites-enabled/000-default.conf, locate the following lines and edit as follows
        ServerAdmin webmaster@localhost
        DocumentRoot /home/pi/Python
        DirectoryIndex index.php
Now reboot the RPi
sudo reboot
Edit index.php
We need to change one line in the index.php, this is the IP Address. This address is the current IP your eth0 has (or the website will not format correctly).
  sudo nano /home/pi/Python/index.php

  look for these lines

  <link rel="stylesheet" type="text/css"
          href="http://ipaddress/bootstrap.min.css">
  <meta name="viewport" content="width=device-width, initial-scale=1">

  Add your master PI IP address where is states ipaddress
Save and close this file.
Give Execute Permissions
There are two files that will be executed by the Pi, these are:
- launchUMD.sh - Autorun at boot, this file launches the UMDisplay01.py
- UMDisplay01.py - Runs the LCD
To make these files executable run the following from the command line:
  sudo chmod 777 /home/pi/Python/launchUMD.sh
  sudo chmod 777 /home/pi/Python/UMDisplay01.py
We should be in a position to test the Pi out now.
Test Web Server
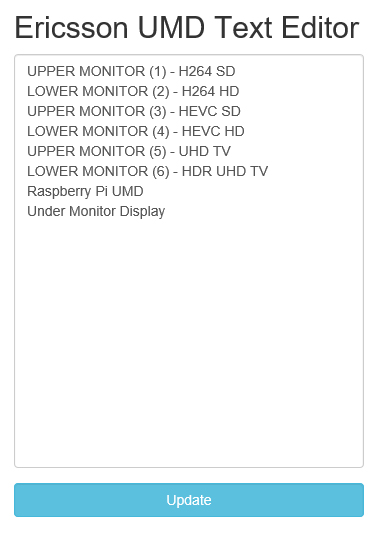
To test the webserver, navigate to your RPi from another computer on the same network, you should see your webpage.
http://youripaddress/index.php

If all is well, you should see a website that looks a bit like the one above. Remember that the text comes from the file /home/pi/Python/my_data.txt so you can check that file if you are unsure.
Test LCD Code
Assuming that you have connected the LCD to the RPi (via the ribbon cable and driver board) then you can test the code that runs the LCD, on the master this file is the:
UMDisplay01.py
This is a python script, you can run this script by entering at the command line:
./UMDisplay01.py
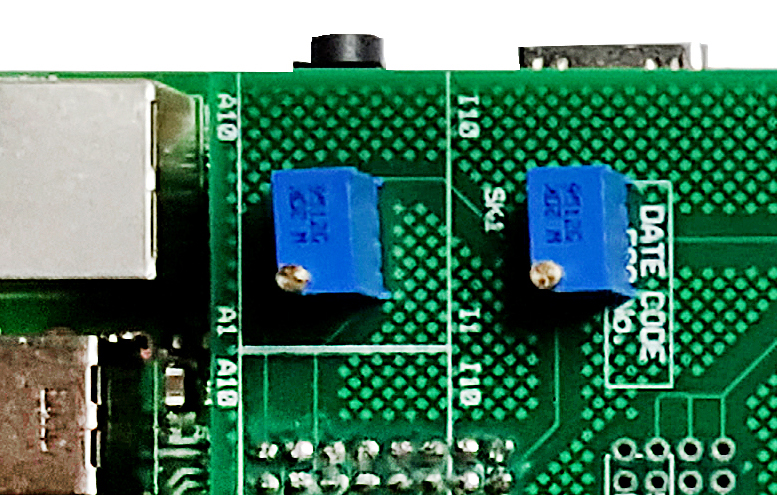
If you are lucky, you will see some text on the LCD, chances are however you will not. This is due to the Potentiometer settings on the driver board, you will need to change these to set the Backlight and LCD intensity.

Adjusting these two potentiometers will allow you to balance the text and backlight intensity to get the brightness level you require.
Making it Automatic
The last part is to automate the process of starting the UMD code. For this we need to add the launcher file to a system file on the RPi.
Edit the file /etc/rc.local to automate this process.
  sudo nano /etc/rc.local

  add this line at the end:
  sudo ./home/pi/Python/launchUMD.sh
To test this, reboot and the LCD should start up automatically (the LCD won't clear on boot, but wait for the “Waiting for 5 Seconds for Network Start” message).
Slave Raspberry Pi(s)
The slave Raspberry Pi(s) download the latest 'my_data.txt' from the Master Raspberry Pi (once a second) so that each slave knows what to display. The 'my_data.txt' file is downloaded using a wget command.
The 'my_data.txt' file has 8 lines, each line is for a particular display, so for example, line 1 & 2 are for LCD1 and reference monitors 1 and 2. Lines 5 & 6 are for LCD and reference monitors 5 & 6.
  Install Raspbian (noobs or Jessie, doesn't matter)
  Update pi - sudo apt-get update && sudo apt-get upgrade -y
  Install xrdp (this so we can access the R-pi using RDP if required)
  Create Python folder (/home/pi/Python)

  Copy files to python folder:  (might have to change file/folder permissions to www-data)
      getData (downloads via wget the_data.txt file)
      UMDisplay0x.py (the code that writes to the display)
      my_data.txt (contains the 8 lines for the displays, this will be updated by getData)
      launchUMD.sh (autorun script)

  Add line to crontab for autoboot
  Add Python/logs folder
Wiring
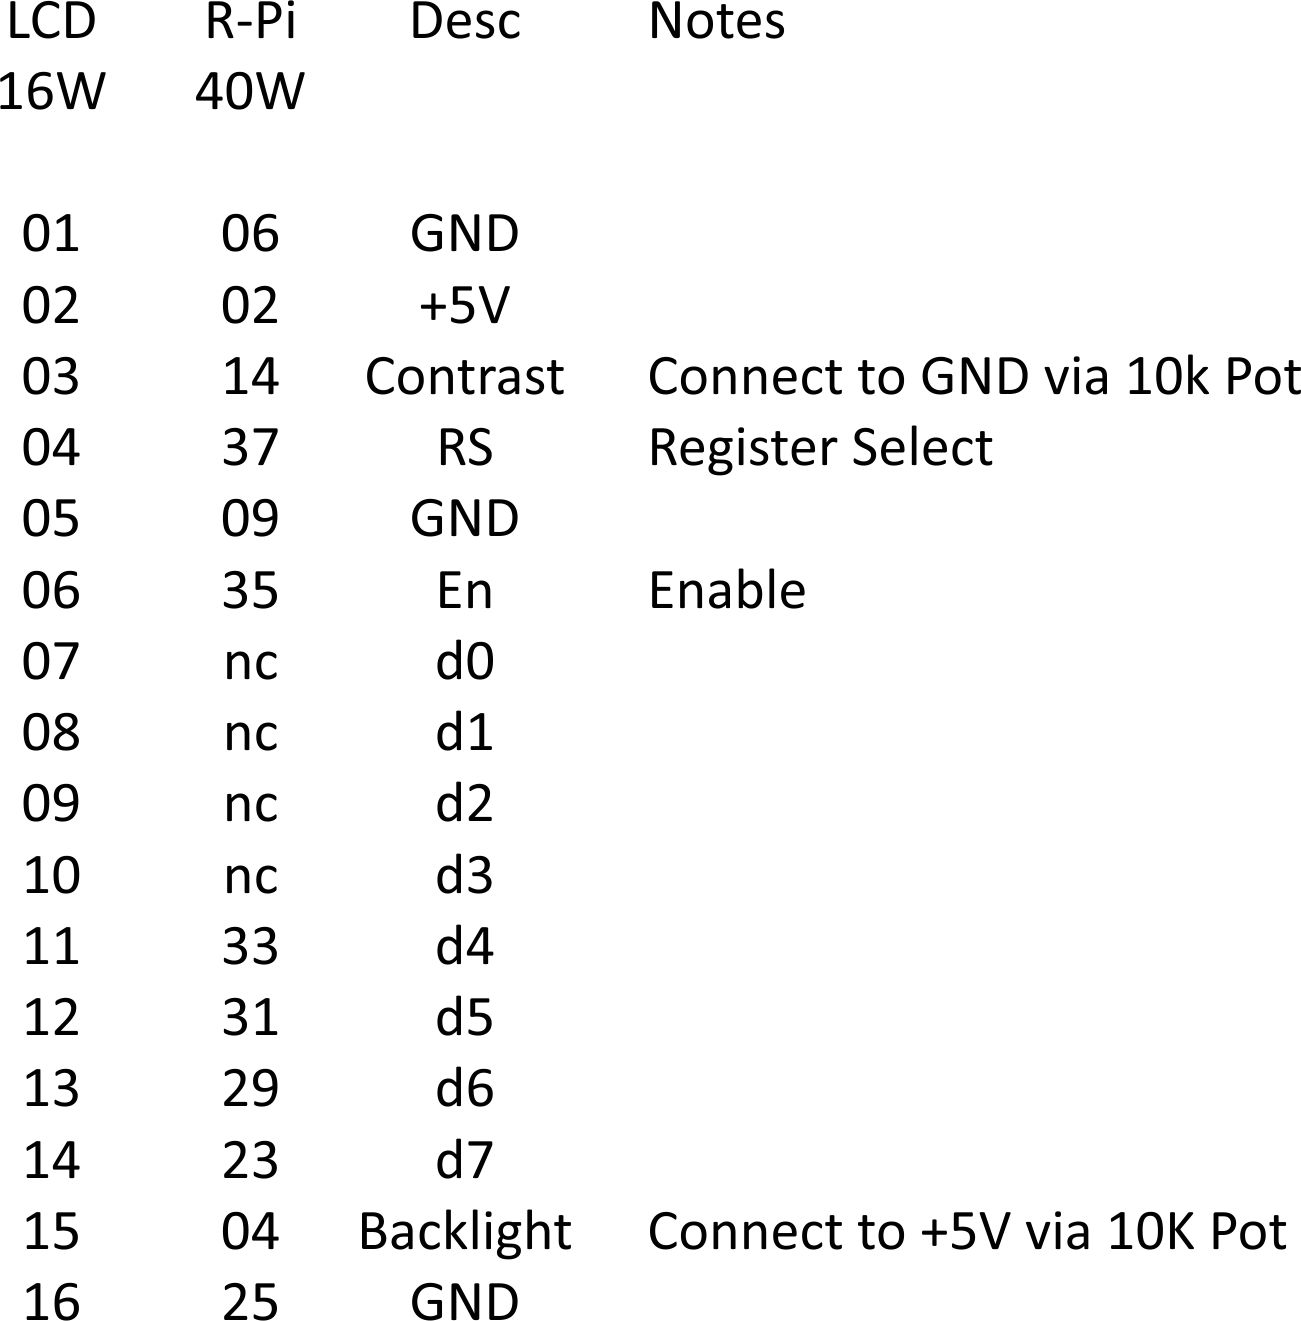
The 2 Line is wired to the Raspberry Pi using the following pin out.

NOTE The Pin out shows Pin 14 of the 40Way Pi header connected, but the diagram does not, this is because Pin 14 is GND, so any ground point can be used.
For this project I am getting some circuit boards made, with a layout similar to this:

This circuit board has a 40 pin header to fit to the Raspberry Pi via a ribbon cable, a 16 pin header to fit to the LCD via a ribbon cable. There are two Variable Resistors to adjust the LCD intensity and back-light. There is a 6 way header to allow the addition of three buttons, these will have the following function:
- Display IP Address
- Blank Line 1
- Blank Line 2
As the IP addresses on the Raspberry Pi will be DHCP (so we can access them from the corporate network) we might need to check the IP addresses from time to time, as these units are headless, a button to display the IP Address on the LCD display will be useful.
Buttons 2 and 3 are to blank the lines on the LCD, this is so that when doing a 'show and tell' with customers, we can keep them guessing before revealing the content types on the montiors.
LCD PCB
Here is the PCB, I had a slight issue with the tracks, and to solve this I had to mount the 16 pin header on the bottom of the PCB (the left and right hand pins of the 16W connector would have to be swapped if you wanted to mount the header on the top of the PCB)


There are an extra 6 pins for additional GPIO connectivity (they will all connect to ground via a 10KR resistor if fitted. While there are 8 pins, only the upper 6 are fitted.

The initial functionality for these will be for 3 buttons:
  1. Hide Line 1
  2. Hide Line 2
  3. Show IP

