Table of Contents
Coppermine Photograph Gallery
Introduction
This project will be using an off the shelf photo gallery called Coppermine that can be found at http://coppermine-gallery.net/
The software is fully featured and allows for mass upload of images, multiple galleries as well as multiple users.
You will need the following software to be installed:
- Suitable OS (I am using Raspbian Jesse Lite)…https://www.raspberrypi.org/downloads/raspbian/
- MySQL……………………………………………………….Use APT-GET
- PHP…………………………………………………………..Use APT-GET
- Coppermine Gallery……………………………………….http://coppermine-gallery.net/
- ImageMagick………………………………………………..Use APT-GET
All of this software is freely available and completely free, so this is a very cost effective project.
There are a ton of user guides on putting Linux on to the Raspberry Pi, so I will not cover that here, once you have got a suitable version of Linux on your device, we need to follow these steps:
- Change Default Password (super important)
- Update the Linux to the latest version
- Change Host Name
- Install Apache
- Install MySQL
- Install PHP
- Install Imagemagick
- Create a Database
- Download Coppermine
- Change some folder permissions
- Install Coppermine
- Setup Apache to see the site
- Configure Coppermine
- Edit some PHP settings (for download sizes)
- Setup a Firewall to restrict access
- Test
Change Default Password
By default your Raspberry Pi comes with an account 'pi' with the password 'raspberry'. For security reasons it's probably a good idea to change the password, but you may also wish to change the username as well. There are a couple of different ways to change the default username but I found the following method the easiest.
In order to change the username 'pi' we will have to create a new user since it's not possible to rename an account while your logged into it. To create a new user:
passwd
Now enter the your current password, followed by the new password (you have to do this twice)
Update the Linux to the latest version
To update the Raspberry Pi to the latest versions, use the following commands
  sudo apt-get update
  sudo apt-get upgrade
Change the Host Name
To change the Host Name we can use the following tool:
sudo raspi-config
From this tool select:
  Advanced Options
  Host Name (enter new host name here)
Raspberry Pi will now reboot.
Install Apache
sudo apt-get install apache2
Install MySQL
  sudo apt-get install mysql-server

  during the install you will have to enter a new password for the MySQL root user (don't forget it)
Install PHP
  sudo apt-get install php5
  sudo apt-get install php5-mysql
Install Imagemagick
sudo apt-get install imagemagick
Create Database
Before we can install Coppermine, which requires a database, we need to create our database (we have installed MySQL which is the database software, but there are no databases by default)
From the command line, type:
  mysql -u root -p (if the mysql username is root and password is piper - enter mysql -u root -ppiper)

      Note there is no space between -p and the password -ppiper

  SUPER IMPORTANT - Don't forget the ; at the end of the database commands

  CREATE DATABASE mygallery;     this creates a database called mygallery
  SHOW DATABASES;                this will list databases, you should see mygallery in the list
  exit
After creating the database, you might want to check this out Run Security After Install
Download Coppermine
To download coppermine (change the last part cpg1.5.42.zip to the latest version)
wget http://downloads.sourceforge.net/project/coppermine/Coppermine/1.5.x/cpg1.5.42.zip
unzip the file
unzip cpg1.5.42.zip
move the foder to apache
sudo mv cpg15x/ /var/www/html/coppermine
Change some folder permissions
chown www-data:www-data -R /var/www/html/coppermine
This changes the default permissions to the www-data (apache) user. So apache has rights to modify the files
We also need to change the write permissions for the following folders:
- include
- albums
- albums/userpics
- albums/userpics/edit
To do this enter:
  chmod -R 777 /var/www/html/coppermine/include
  chmod -R 777 /var/www/html/coppermine/albums
Setup Apache
If you use a browser to look at your computer (http://youripaddress) you will get the default Apache page, which is nice because it means apache is running, but not so good because you want your site.
What we need to do is edit the apache config to point you your site.
  cd /etc/apache2
  sudo nano 000-default-conf

  change DocumentRoot to /var/www/html/coppermine/
Restart Apache
sudo /etc/init.d/apache2 restart
Configure Coppermine
Connect to the site
http://youripaddress
You will get the message:
  Coppermine Photo Gallery seems not to be installed correctly, or you are running coppermine for the first time.
  You'll be redirected to the installer. If your browser doesn't support redirect, click here.
when you click 'here' the installer will start.

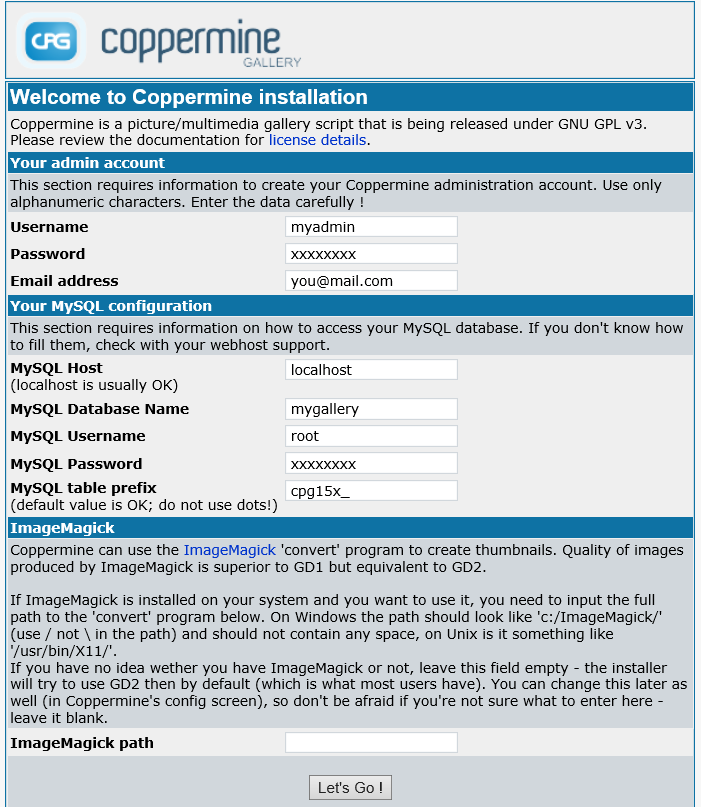
Fill out your details in the window above using your passwords and usernames. Remember Apache username is probably root.
Edit some PHP settings
Open and edit file php.ini
sudo nano /etc/php5/apache2/php.ini
Find and edit these two settings define the maximum file upload size:
  upload_max_filesize = 2000M
  post_max_size = 3000M
This will increase upload limits on a single file to 256 MB, from the default of 2 MB.
“post_max_size” is set 1 MB larger than “upload_max_filesize” to take into account for any additional meta-data about the file that is included in the request (e.g., Header data).
If multiple files are uploads in the same POST request, then post_max_size will need to be set greater than the size of all the files combined (i.e., post_max_size > upload_max_filesize * number-of-files + 1MB * number-of-files).
Now Reboot
Firewall Setup
Please see the following page:
UFW - Uncomplicated Firewall
